Using SmugMug Feeds for OS X Screen Savers
Background
SmugMug offers up lots of options to review the latest content through various "feeds", including RSS and Atom. These technologies allow you to catch up on the latest additions to a SmugMug photo album (or entire collection) without revisiting the page to manually see what's new. For this page, the term "RSS" should be read as "RSS or Atom".
RSS has gained tremendous popularity in recent years, allowing web users to custom-craft their own set of news, blog entries, or other dynamic content. This standard has extended to various photo sharing sites, to include SmugMug. Due to their popularity, some system software has grown to accommodate dynamic content as syndicated through RSS feeds.
The most recent version of Apple, Inc's Mac OS X operating system, called "Leopard" has a built-in screen saver module that will allow you to enter one or more RSS feeds, using photos from one or more SmugMug collections as source material. This page will explain how to use and customize those feeds so they will best work with the new screen saver module.
Choosing a Feed URL
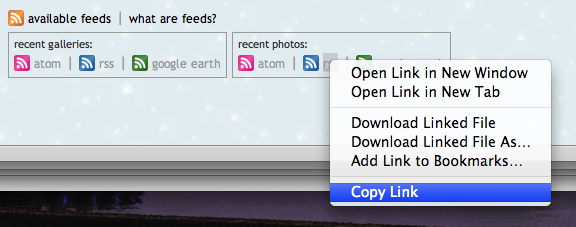
First, bring up the main SmugMug page for the album to which you'd like to subscribe. This will look like "<something>.smugmug.com". Scroll all the way to the bottom and click on the "Available Feeds" link, which will expand to what's shown here.
Generally, for screen saver use, you will want to use the "recent photos" link, but feel free to experiment. This page will use "recent photos" for all examples. Right-click the "atom" link in the "recent photos" box and select "Copy Link".
NOTE: originally, the "rss" link worked just fine, but recently, it appears that only the Atom feeds will work. Wherever you see "rss" on these instructions, please substitute "atom." Updated screenshots are pending.
Tweaking the Feed URL
The URL you just copied is not quite ready for business. We'll want to modify it so it'll use more photos in a high enough quality to be worth our while! To modify the URL, open TextEdit and paste the URL you copied into a new text document. However, TextEdit will recognize what you copied as an Internet Link, so use the "Paste and Match Style" option under the Edit menu. You'll see something like the following:
Now for the fun part. There are LOTS of ways to customize your feed URLs in SmugMug. The SmugMug wiki keeps an up-to-date list of these options on their Feeds Examples page. We'll be using two of these options here, but again, feel free to experiment. Note that as you're adding elements to the feed URL, capitalization matters!
Number of items displayed
The default feed contains 100 items. That may or may not be enough, depending on how many photos get added to the gallery you're looking at. If you want to change this number, add the following to the feed URL in TextEdit: "&ImageCount=xx" where xx is a number. The example below shows a feed for the most recently-added 150 photos.
Image size
The default image size is pretty small - just 150 pixels on the longest dimension. Clearly that's far too small to look good on your screen! We can customize the size of the image we see via the feed URL. Just add the following: "&Size=Medium". There are other sizes, but generally, "Medium" is best if you use the Collage screen saver format, or use "XLarge" for the default pan-and-zoom screen saver format.
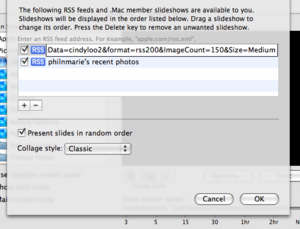
The resulting url will look something like the following:
Loading the feed URL to the Screen Saver
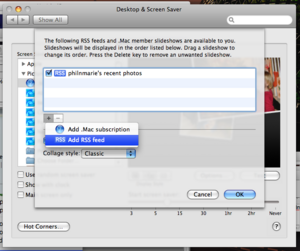
The rest is pretty straightforward. Open the "Desktop & Screen Saver" item under "System Preferences", then select the "Screen Saver" button. Choose the ".Mac and RSS" Screen Saver and click "Options". At first you'll see an empty list - click the "+" (plus sign) button near the center of the window on the left, then select "Add RSS feed". Now copy the tweaked URL from TextEdit and paste it into the feed list. (The URL will validate and display the feed name in place of the URL you just entered - don't worry, this is supposed to happen!)
You can now choose different options for the screen saver - it's completely up to you, but here are a few tips to know if you use the "Annotated" Collage style:
- "Show name" will display the SmugMug caption, most of which are too wide for the collage photo frame. I leave this option un-checked.
- "Show date" seems to show the date the photo was uploaded to SmugMug, not the date the photo was taken. Personally, I can't yet decide if that's useful or not...
Other Tricks
Narrowing the selection
You can choose a feed for just one album as an RSS source. Just navigate to the album to which you want to subscribe, then click the "available feeds" link at the bottom. The rest of the process is the same!
More than one subscription
You can have more than one feed URL loaded to the screen saver - just keep using the "+" button to add more URLs!
Using RSS in addition to local photos or other screen savers
Unfortunately, right now you can only select one screen saver at a time. However, I seem to recall that you could select a number of screen savers to be cycled randomly in previous versions of OS X, so if I find a better way to do it, I'll update this page.


