E-Mail Setup/Alias Addresses Forwarding to Gmail
Some of our users have what are known as "alias addresses", where an email address managed by identityVector forwards to another email provider. Since there are so many possible email providers, we cannot document settings for each one. However, since many of our customers forward their mail to Gmail, we've created a brief set of steps to enable the alias in Gmail. (All screenshots can be enlarged.) No further support is provided for this configuration - please consult Gmail's own documentation for any further details.
First, note that your Gmail account must have two-factor authentication (2FA) enabled. Steps required to enable this are available directly from Google. The steps below will not work without 2FA enabled, so please ensure this feature is activated before proceeding.
1. Create an application-specific password. Your random characters will be different than those in the screenshot. Copy these characters to the clipboard or write them down before proceeding. Click "DONE" when you have completed these steps.


2. In Gmail, enter the account settings page, then select the "Accounts and Import" tab. Click "Add another email address"


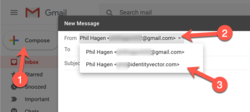
3. Enter your alias email address and ensure the "Treat as alias" box is checked.


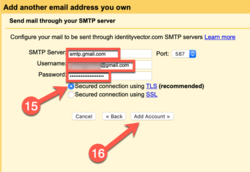
4. Enter smtp.gmail.com as the server name, port 587, your full Gmail address as the username, and the app-specific password copied/written down from above as the password. Select the "Secured connection using TLS" option. Click "Add Account >>".

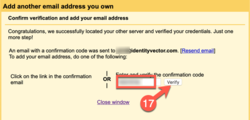
5. Google will send you an email containing a numerical code that is needed to validate the alias email address. Since your mail forward will already be in place, this will be delivered to your Gmail account - you may need to open gmail in an additional window to get the code. When the email arrives, validate the account by pasting the code into the window.

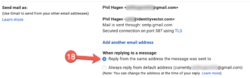
6. Return to the settings screen and you'll see the alias email address displayed. Ensure the "Reply from the same address the message was sent to" option is selected

7. To send an email from the alias email address, use the drop-down selection box when composing an email. When replying to an email that was delivered via your alias email address, the correct address will already be selected.